
Is It Safe to Wash Your Engine Bay With Water?
You popped your hood last weekend and finally took a real look at your engine bay. Years of road grime, leaves, dust, and oily residue caked onto every plastic cover and every bolt. Your first instinct was to grab the garden hose. Then you stopped. Wait, can I actually spray water on this thing? Won't I fry something? Won't my car stop starting?
It's the most common question we hear from Lincoln drivers about engine bay cleaning. People are afraid of water under the hood, and for good reason. There's a wrong way to do this that costs you a $1,500 repair. There's also a right way that takes 30 minutes and makes your engine look factory new. We do this every week at our shop at 2043 O St, so here's the full breakdown of what's safe, what's not, and how to do it without wrecking your car.
Why Most People Are Afraid to Wash Their Engine Bay
For decades, the conventional wisdom has been "never get water near your engine." That advice came from an era when carburetors and distributor caps could be ruined by a few drops of water in the wrong place. But cars have changed. Modern fuel injection systems, sealed electrical connections, and weatherproofed components are designed to handle a moderate amount of water exposure. After all, your engine bay gets soaked every time you drive in heavy rain.
That said, "designed to handle some water" is not the same as "blast it from inches away with no precautions." There's a right way and a wrong way to clean an engine bay, and the difference between them is the difference between a refreshed engine compartment and a $1,500 repair bill at your local Lincoln mechanic. The single most important rule, whether you're using a garden hose or a pressure washer, is keeping the nozzle at least 12 inches away from electrical components. Edmunds covers this in depth and confirms what we tell every customer who asks: water itself is fine, it's careless application that causes problems.
The Real Risks of Engine Bay Washing
Before you grab the hose, you need to understand exactly what you're working around. Modern engines have dozens of electrical connectors, sensors, and modules. Most are weatherproof but not waterproof. High-pressure water can force moisture past seals and into connectors that were never meant to be submerged. Once water gets in, it can cause shorts, corrosion, or intermittent electrical gremlins that drive you and your mechanic crazy for months.
Thermal shock is another risk that catches people off guard. Spraying cold water onto a hot engine block can cause warping or cracks, especially on aluminum components. Aluminum heads and exhaust manifolds get extremely hot during operation, and the sudden temperature change from cold water can stress the metal. Popular Mechanics has a great deep-dive on the technical side of this if you want the engineering explanation. While modern engines are more resilient than older ones, this is still a real risk that's easy to avoid by simply waiting for the engine to cool.
The components that really don't like water are the air intake, the alternator, the battery terminals, the engine control unit, and on older vehicles, the distributor cap. Water in your air intake can hydrolock your engine, which is catastrophic. Wet battery terminals can short and corrode rapidly. The fix for all of this is the same: cover them with plastic bags or aluminum foil before you spray anything. It's the single most important step in safe engine bay cleaning, and it takes about three minutes.
One more risk most DIY guides skip: if your engine has any cracked vacuum hoses, loose electrical connectors, or worn seals, water will find them. This won't be obvious until something stops working a few hours later. Older vehicles with high mileage are especially prone to this. AAA recommends a full visual inspection before you ever spray water under the hood. If you see anything questionable, fix it first or skip the water wash entirely.
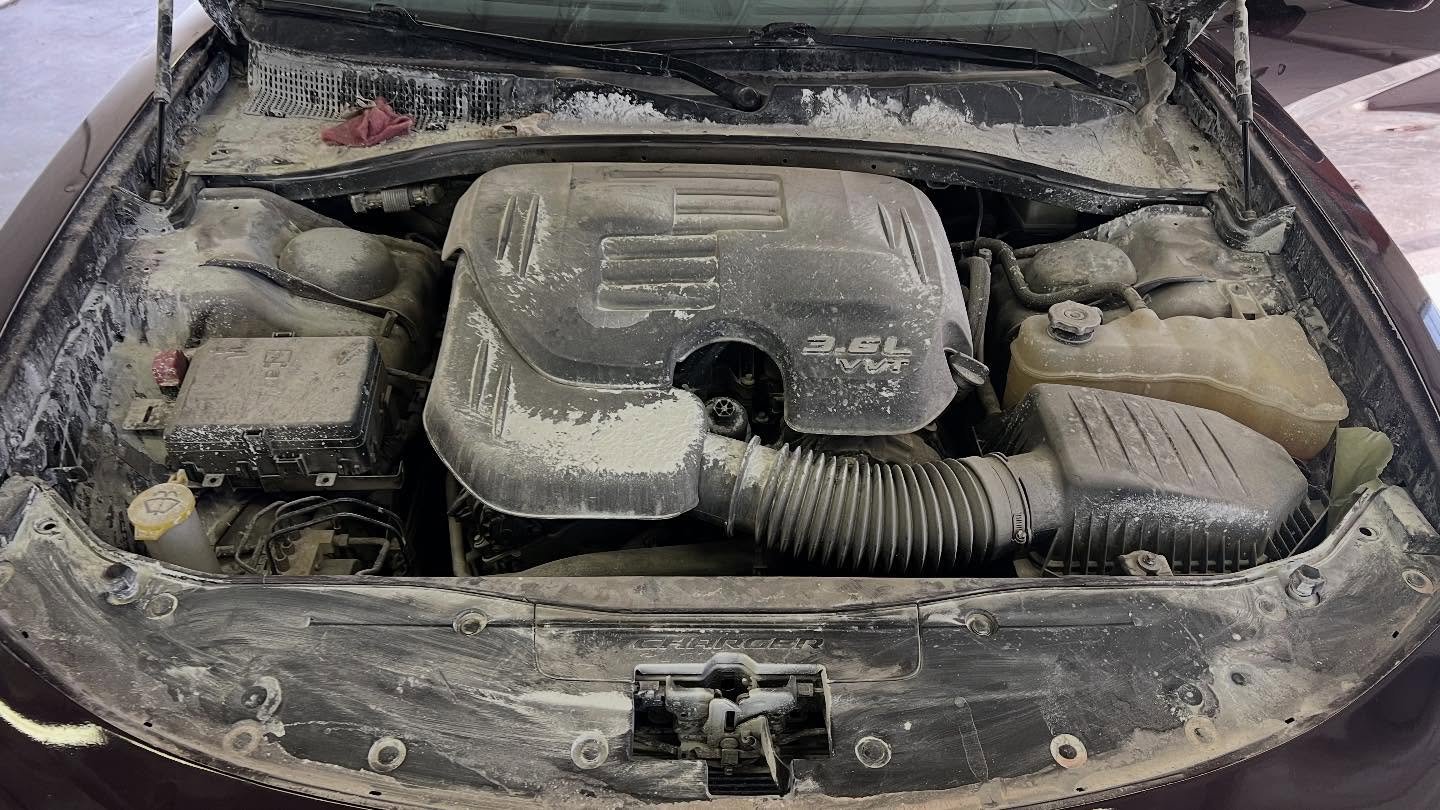

That Dodge Charger above is a good example of what a few years of Nebraska road salt, dust, and dry winter air will do to an engine bay. The plastic engine cover was caked with a chalky white residue, the air intake was coated, and the battery box was barely visible under the buildup. After a careful low-pressure wash, proper degreasing, and a quality dressing, the same engine looks factory fresh.
The Step-by-Step Safe Engine Bay Wash
If you've decided to do this yourself, here's the same general process we use professionally, simplified for the home garage. Plan on 45 minutes to an hour from start to finish. Don't rush this.
Start by letting your car sit for at least an hour after driving. The engine should be warm to the touch but not hot. Working on a hot engine is dangerous and risks thermal shock damage. While it cools, gather your supplies: a garden hose with a standard spray nozzle (or a pressure washer if you have experience using one and can hold it at a safe distance), an automotive engine degreaser from any auto parts store, a soft long-handled brush, plastic bags or aluminum foil, painter's tape, and microfiber towels. A leaf blower or compressed air for drying makes a huge difference if you have one.
Next, pop the hood, locate the battery, and disconnect the negative terminal. This adds a layer of protection against electrical shorts and is a 30-second precaution that can save you from a bad day. Then carefully cover every electrical component you can see. Air intake, alternator, fuse box, exposed connectors, and the distributor if your car has one. Tape the edges down so water can't sneak underneath. This is the most important step in the entire process.
Pre-rinse the engine bay with a light mist from your garden hose. The goal is to loosen surface dirt, not blast everything off. Don't aim water directly into electrical components even though they're covered. Then spray your automotive degreaser on the dirty areas, avoiding the covered electrical bits, and let it sit for three to five minutes. Don't let it dry on the surface.
Use your soft-bristle brush to scrub the stubborn grime, especially around the valve cover, oil pan, and intake manifold. A long-handled brush helps you reach deeper areas without leaning your body on hot or sharp engine parts. Then rinse with low pressure water from top to bottom, letting water flow off the engine. Multiple light rinses work better than one heavy one. Avoid spraying directly into any opening.
Drying is where most DIY engine washes go wrong. Use compressed air, a leaf blower, or microfiber towels to dry every surface, every connector, every crevice. Standing water is your enemy. Take your time on this step. When everything is dry, remove all the plastic bags and tape, inspect the engine for any standing water, and reconnect the battery.
If you want to take it one step further, apply a non-greasy engine dressing to the plastic and rubber components. This protects them from UV damage and gives the engine bay that "just detailed" look. Spray it on a microfiber towel first, then wipe. Never spray directly on hot or electrical parts.
Finally, start the engine and listen. Check for any unusual sounds and look for warning lights on the dashboard. Let it run for 10 to 15 minutes to evaporate any residual moisture. If everything sounds normal and there are no warning lights, you're done.
Want a professional engine bay cleaning instead?
Skip the risk and the hour of work. Engine bay cleaning is a $50 add-on to any detailing package at our shop in Lincoln. You can pair it with a Hand Wash and Wax, an Essential Interior, or any of our full packages. Drop your car off and we'll have it factory-fresh in 30 to 45 minutes.
Schedule OnlineThe Mistakes That Cause Real Damage
Over the years we've seen what happens when engine bay cleaning goes wrong. The same handful of mistakes show up over and over.
The biggest one is holding the water source too close to electrical components, regardless of whether you're using a garden hose or a pressure washer. Distance matters more than the tool itself. Keep the nozzle at least 12 inches away from anything electrical. We've seen Lincoln customers come in with electrical issues that started right after an engine bay wash where they got the nozzle too close to the alternator or fuse box, and tracing those problems is expensive. We use pressure washers in the shop, but always at a safe distance with experienced hands. If you don't have that experience, a standard garden hose nozzle is the safer choice.
The second is washing a hot engine. Aluminum components don't like sudden temperature drops, and you can crack a head or warp a manifold. Wait the hour. It's not optional.
The third is using household degreasers like dish soap, kitchen cleaners, or industrial degreasers from the hardware store. These often contain ingredients that damage rubber seals, hoses, or paint over time. Use an automotive engine degreaser specifically formulated for engine components. They're cheap, available at any auto parts store, and they work.
The fourth is skipping the covering step. People think modern cars are sealed enough that they don't need to cover anything. They're wrong. Even a small amount of water in the wrong connector can cause problems. Three minutes of taping bags over electrical components is the cheapest insurance you can buy.
The last one is leaving standing water in the engine bay and just walking away. Water will sit in low spots, find its way into connectors over the next few days, and cause issues that seem to come from nowhere. Dry everything thoroughly. Compressed air or a leaf blower makes this easy. Microfiber towels work too if you're patient.


This Audi V6 is another good example. The before shot shows what years of dust, dry road grime, and skipping engine maintenance looks like. The plastic intake cover was dull and gray, the brake fluid reservoir was filthy, and the battery cover was buried under buildup. The after shot shows what a careful clean and dressing produces. Same engine, same components, completely different first impression.
Why Bother Cleaning Your Engine Bay At All?
If it sounds like a lot of work, you might be wondering whether it's even worth doing. We get this question a lot. Here's the honest answer.
A clean engine bay makes oil leaks, coolant leaks, and worn components instantly visible. We've had Lincoln customers come in for a routine engine clean and discover a slow oil leak that would have caused major problems six months later. Catching things early saves money. That alone makes it worth doing once a year.
The resale value point is real too. If you ever sell your car, a clean engine bay is one of the first things a savvy buyer checks. It signals that the car has been maintained. Kelley Blue Book lists engine bay condition as one of the factors that influences private-party valuations. The same vehicle with a clean engine bay versus a grimy one can be worth $500 to $1,500 more. We see Lincoln customers book this service specifically before listing their vehicle, and it pays for itself many times over.
Heat dissipation matters too, though most people don't think about it. A heavy buildup of grease and dust on engine components actually traps heat. A clean engine bay runs cooler, which means longer component life and better efficiency.
And honestly, there's something satisfying about popping the hood and seeing a clean, well-maintained engine. If you take pride in your vehicle, a detailed engine bay is the finishing touch most car owners never bother with. That's why people who actually care about their cars do this regularly.
How Often Should You Clean Your Engine Bay?
For most Lincoln drivers, once a year is plenty. If you drive on dusty gravel roads regularly, live in a heavily salted area through winter, drive a vehicle that's parked outside year-round, or just take pride in your vehicle, you might do it twice a year. Daily commuters in moderate climates can usually get by with a yearly clean.
The best time to do it is in late spring after winter salt season ends, or in early fall before the first snow. Both are climate sweet spots in Nebraska where the engine bay isn't fighting fresh contamination right after you clean it.
If you've never done it before and your car is more than 5 years old, the first clean is the hardest. Years of accumulated grime takes longer to remove than annual maintenance buildup. After that first deep clean, every subsequent clean is much faster.
When to Skip the DIY and Hire a Professional
Some situations are best left to a professional detailer. If you're not 100% sure what to cover, the cost of a mistake is much higher than the cost of professional cleaning. If your engine bay has years of buildup, heavy grease and grime needs commercial-grade degreasers and proper application that's hard to replicate at home. If you drive a luxury or high-performance vehicle, the cost of damaging a sensor on a BMW, Audi, Porsche, or similar can run into thousands. Professional cleaning is cheap insurance.
If you don't have compressed air for drying, a soft long-handled brush, proper engine degreaser, and a way to safely cover components, the result will be limited. And honestly, if you just want it done right the first time, a professional engine bay cleaning takes 30 to 45 minutes and costs less than a single repair caused by DIY mistakes.
At MC Auto Detailing in Lincoln, we offer engine bay cleaning as a $50 add-on to any detailing package. We use professional degreasers, compressed air for thorough drying, and protective covers for sensitive components. The result is a factory-fresh engine bay that takes 30 to 45 minutes and saves you the time and risk of doing it yourself. Most customers pair it with a Full Interior Detail or a Hand Wash and Wax so the whole car gets attention in one drop-off. You can also add headlight restoration for another $50 if your headlights are looking foggy. See all of our packages and pricing for the full menu, or request a custom quote if you're not sure which package is the right fit.
Ready for a professional engine bay cleaning?
$50 add-on to any detailing package. 80+ five-star Google reviews. Family-owned at 2043 O St in Lincoln, NE. Open Tuesday through Sunday, 10am to 6pm.
Schedule Online Call or Text 402-525-7201Frequently Asked Questions
Can I use a pressure washer to clean my engine bay? Yes, with proper technique. The key is keeping the nozzle at least 12 inches away from any electrical components and using a wide spray pattern, not a pinpoint jet. We use pressure washers in our shop every day on engine bays without issues, but we're trained to do it safely. If you've never used a pressure washer on an engine, a standard garden hose with a regular spray nozzle is the safer DIY choice. The danger isn't the pressure washer itself, it's holding it too close or aiming it directly into electrical connectors.
How often should I clean my engine bay? For most drivers, once or twice a year is plenty. If you drive on dusty roads regularly, live in a heavily salted area in winter, or just take pride in your vehicle, you might do it more often. Daily commuters in moderate climates can usually get by with a yearly clean.
What if water gets into my engine and it won't start? First, don't panic. Wait 30 minutes to an hour for any moisture to evaporate, then try again. If it still won't start, the most common culprit is moisture in the spark plug area or a wet electrical connector. A can of compressed air to blow out connectors usually solves it. If problems persist, take it to a mechanic and explain you just washed the engine bay so they know where to look.
Will engine bay cleaning void my warranty? No, simply washing your engine bay won't void your warranty. However, if water damage causes a problem and the manufacturer can prove the damage was from improper washing (like blasting a pressure washer at point-blank range into electrical connectors), they may deny that specific claim. As long as you follow proper procedures and keep distance from electronics, your warranty is safe.
Can I use dish soap or household degreaser? We don't recommend it. Household products often contain ingredients that can damage rubber seals, hoses, or paint over time. Use an automotive engine degreaser specifically formulated for engine components. They're cheap, available at any auto parts store, and worth it.
How much does professional engine bay cleaning cost in Lincoln? Most professional shops charge between $40 and $100 depending on the condition of the engine bay. At MC Auto Detailing, we offer engine bay cleaning as a $50 add-on to any detailing package. Heavily neglected engine bays may take longer but the price typically stays the same.
Should I clean my engine bay before selling my car? Absolutely. A clean engine bay is one of the strongest signals to a buyer that the car has been well maintained. It can add hundreds to your sale price and helps your car stand out from others on the market. Lincoln customers regularly book this service specifically before listing their vehicle for sale.
What if my engine bay has a lot of plastic covers? Modern cars with plastic engine covers are actually easier to clean. The covers protect most of the sensitive components underneath. You can wash and wipe down the covers themselves, and the components below stay shielded. Just don't remove the covers unless you know exactly what you're doing.
Can I add engine bay cleaning to other services? Yes, that's actually how it's offered. Engine bay cleaning is a $50 add-on, not a standalone service. Most customers pair it with a Full Interior Detail, an Essential Interior, or a Hand Wash and Wax so the entire car gets professional attention in one drop-off.